Shark Snack Cups- Fun & Easy Recipe
Shark Snack Cups are the ultimate treat for anyone looking to add a splash of fun and flavor to their day! These delightful little cups have taken kitchens by storm, and it’s not hard to see why. They’re incredibly versatile, perfect for a quick afternoon pick-me-up, a playful addition to a party spread, or even a surprisingly satisfying dessert. What truly sets Shark Snack Cups apart is their ingenious design, combining delicious flavors with an adorable presentation that’s guaranteed to bring smiles. Imagine a bite-sized explosion of taste and texture, cleverly crafted to resemble a playful shark – it’s an experience that delights both the palate and the eyes.
Why We Adore Shark Snack Cups
The secret to their charm lies in their simplicity and adaptability.

Shark Snack Cups
Get ready to dive into a sea of fun with these adorable and delicious Shark Snack Cups! Perfect for a summer party, a beach-themed birthday, or just a whimsical afternoon treat, these cups are surprisingly easy to make and guaranteed to be a hit with kids and adults alike. We’re creating a creamy, dreamy base that perfectly complements the star of the show: the gummy sharks! Imagine a light, airy dessert that’s not overly sweet, with just a hint of tropical flavor. It’s the kind of treat that sparks joy and imagination, transforming a simple snack into an ocean adventure. The beauty of these snack cups lies in their simplicity; you don’t need to be a master baker to whip them up. Gather your ingredients, get your little helpers involved, and prepare for some serious smiles.
Ingredients:
- 1 tub (8 oz.) COOL WHIP Whipped Topping, thawed
- 2 containers (6 oz. each) low-fat vanilla yogurt
- 1/4 cup boiling water
- 1 (3 oz.) pkg. Jell-O mix (any blue flavor works best for an ocean feel, like Berry Blue or Tropical Blue)
- 1/2 cup Graham cracker crumbs
- Individual serving cups or dishes (about 6-8 oz. size recommended)
- Gummy sharks (enough to place one or two in each cup)
- Optional: Parasol picks for an extra touch of beachy flair
Creating the Ocean Base
The foundation of our Shark Snack Cups is a light and refreshing mousse-like mixture. We’ll be using the convenience of COOL WHIP and the tang of vanilla yogurt to create a delightful base.
1. Prepare the Blue Ocean Gelatin: In a heatproof bowl, carefully pour the boiling water. Gently sprinkle the Jell-O mix over the hot water. Stir continuously with a whisk for at least 2 minutes, or until the Jell-O powder is completely dissolved. It’s really important to ensure there are no grainy bits left at the bottom of the bowl. This will prevent any unpleasant texture in our final dessert. Allow this gelatin mixture to cool slightly at room temperature. You don’t want it to be hot when we add it to the yogurt and Cool Whip, as it could affect their texture. Letting it sit for about 15-20 minutes should be sufficient.
2. Combine Creamy Elements: In a separate, larger mixing bowl, add the thawed COOL WHIP Whipped Topping and the two containers of low-fat vanilla yogurt. Using a spatula or a whisk, gently fold these two ingredients together until they are just combined. Avoid overmixing, as this can deflate the COOL WHIP and make the mixture less airy. You want a smooth, creamy blend. The yogurt adds a lovely subtle tang that balances the sweetness of the Jell-O and COOL WHIP, making for a more sophisticated flavor profile.
3. Incorporate the Gelatin: Once the Jell-O mixture has cooled to room temperature (it should feel lukewarm, not hot), gradually pour it into the yogurt and COOL WHIP mixture. Continue to fold everything together gently until the blue gelatin is evenly distributed throughout the creamy base. You should see beautiful swirls of blue appearing. This is where the magic starts to happen, transforming our creamy mixture into a vibrant ocean hue! Be sure to scrape the sides and bottom of the bowl to ensure all the ingredients are well incorporated. The consistency at this stage will be fairly loose, but it will firm up as it chills.
Assembling the Shark Snack Cups
Now comes the fun part: assembling these delightful ocean scenes! This is a great step to get kids involved, as they can help layer the ingredients and place the gummy sharks.
4. Layer the Graham Cracker Sand: Take your individual serving cups. Begin by spooning about a tablespoon or two of graham cracker crumbs into the bottom of each cup. This layer represents the sandy seabed. You can press it down gently with the back of a spoon to create a more compact layer, or leave it loose for a more natural beach look. The slightly crunchy texture of the graham crackers adds a wonderful contrast to the creamy filling. Make sure you have enough crumbs for all your cups; this step is crucial for that authentic beach vibe!
5. Fill with Ocean Mousse: Carefully spoon the blue Jell-O and COOL WHIP mixture over the graham cracker crumbs in each cup. Fill each cup about two-thirds to three-quarters full, leaving a little space at the top for our gummy shark inhabitants. Try to pour or spoon the mixture evenly into each cup so that everyone gets a comparable amount of dessert. If the mixture is a bit too liquidy at this point, don’t worry; it will set up nicely in the refrigerator. For a smoother finish, you can gently tap the bottom of the cups on your counter a few times to release any air bubbles.
6. Add the Gummy Sharks and Finish: Now for the most exciting part! Gently place one or two gummy sharks into each cup, so they appear to be swimming in the blue ocean. You can position them so they’re peeking out of the “water” or nestled amongst the imaginary waves. If you’re using the optional parasol picks, stick one into the side of each cup for a festive and tropical touch. These little details really elevate the presentation and make the snack cups even more special.
Chill and Serve
7. Refrigerate to Set: Once your Shark Snack Cups are assembled, cover them loosely with plastic wrap or individual lids if your cups came with them. Place the cups in the refrigerator and allow them to chill for at least 2-3 hours, or until the Jell-O mixture has set completely. This chilling time is essential for the dessert to firm up and for the flavors to meld together. The longer they chill, the better the texture will be. When ready to serve, they will be wonderfully cold and refreshing, with a lovely creamy consistency.
These Shark Snack Cups are not just a dessert; they’re an experience! They bring a touch of playful enchantment to any occasion. Enjoy the satisfied smiles and happy “oohs” and “aahs” as everyone discovers their own little ocean in a cup. They are a delightful way to bring a bit of the ocean to your table, no matter the weather outside.
Conclusion:
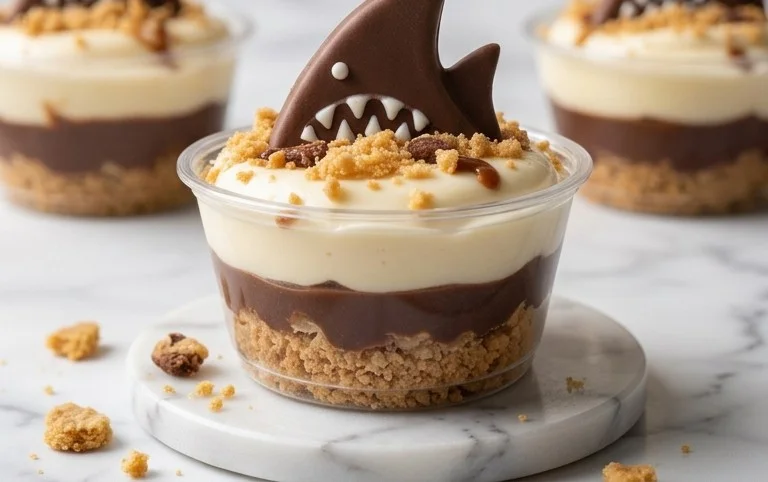
There you have it! My easy and delicious Shark Snack Cups recipe is perfect for any occasion, whether it’s a birthday party, a classroom treat, or just a fun afternoon activity with the kids. The combination of creamy pudding, crunchy cookies, and those adorable gummy sharks makes for a delightful and visually appealing treat that’s always a hit. I love how simple this recipe is, using readily available ingredients that create such a memorable dessert. It’s a fantastic way to bring a little bit of the ocean to your table!
Feel free to get creative with your serving suggestions! These Shark Snack Cups are fantastic served chilled, making them a refreshing option on a warm day. They look incredible as part of a larger ocean-themed dessert spread, alongside blue Jell-O “water” or graham cracker “sand.” For variations, you can experiment with different pudding flavors like chocolate or vanilla, or even swap out the chocolate cookies for vanilla wafers or crushed Oreos. Don’t be afraid to try different types of gummy candies for the “sharks” too! I truly encourage you to give this recipe a try; you’ll be so pleased with the result and the smiles it brings.
Frequently Asked Questions:
Can I make these Shark Snack Cups ahead of time?
Yes, absolutely! You can prepare the pudding and crush the cookies a day in advance and store them separately in airtight containers. Assemble the Shark Snack Cups a few hours before serving to ensure the cookies stay crunchy. Just add the gummy sharks right before you plan to serve them to prevent them from softening.
What if I can’t find gummy sharks?
No problem at all! If you can’t find gummy sharks, you can easily substitute them with other ocean-themed candies like gummy whales, gummy fish, or even Swedish Fish. You could also use blue or white candy melts to create simple “wave” decorations on top of the pudding for a similar effect.
Are these Shark Snack Cups suitable for a nut allergy?
This recipe, as written, does not contain nuts. However, it’s always important to check the ingredient labels of all your components (pudding mix, cookies, and candy) to ensure they are free from cross-contamination if you have a severe nut allergy.
Shark Snack Cups
Fun and easy no-bake dessert cups featuring a creamy Jell-O and whipped topping mixture with gummy sharks swimming in them, topped with graham cracker crumbs.
Ingredients
-
1 tub (8 oz) COOL WHIP Whipped Topping, thawed
-
2 containers (6 oz each) low-fat vanilla yogurt
-
1/4 cup boiling water
-
1 (3 oz) pkg Jell-O mix
-
1/2 cup Graham cracker crumbs
-
Gummy sharks
-
Individual serving cups/dishes
-
Parasol picks (optional)
Instructions
-
Step 1
Prepare the Jell-O according to package directions using the boiling water and 1 cup of cold water (omit cold water and use only boiling water as directed by the Jell-O package for the specific flavor if different). Let it cool slightly. -
Step 2
In a large bowl, gently fold together the thawed COOL WHIP Whipped Topping and the low-fat vanilla yogurt until well combined. -
Step 3
Slowly whisk the slightly cooled Jell-O mixture into the yogurt and whipped topping mixture until smooth and uniformly colored. -
Step 4
Spoon a layer of graham cracker crumbs into the bottom of each individual serving cup. -
Step 5
Carefully pour or spoon the Jell-O mixture over the graham cracker crumbs, filling the cups about three-quarters full. -
Step 6
Gently place a few gummy sharks into each cup, so they appear to be ‘swimming’. -
Step 7
Chill the Shark Snack Cups in the refrigerator for at least 2-3 hours, or until the Jell-O is fully set. -
Step 8
If desired, add a parasol pick to each cup before serving.
Important Information
Nutrition Facts (Per Serving)
It is important to consider this information as approximate and not to use it as definitive health advice.
Allergy Information
Please check ingredients for potential allergens and consult a health professional if in doubt.