Melted Chocolate Jack-o-Lantern Cookies
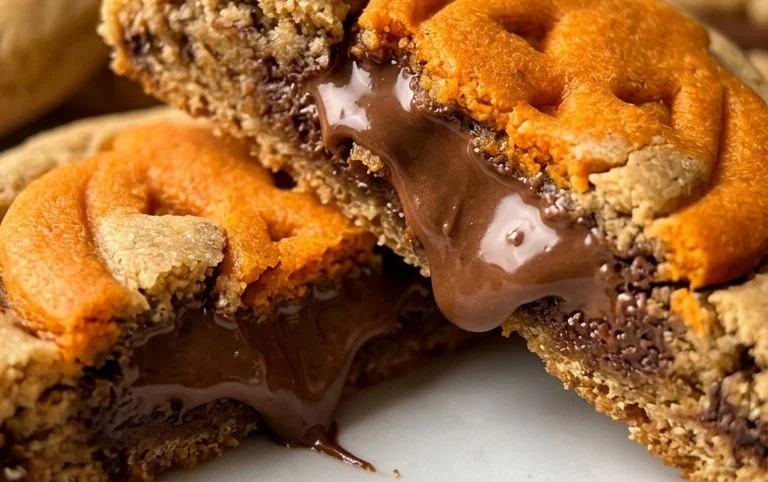
Milk Chocolate Stuffed Jack-O’-Lantern Cookies are about to become your new fall obsession! As the air gets crisper and the leaves begin to turn, there’s an undeniable craving for treats that capture the essence of the season. And what better way to celebrate than with a cookie that looks as festive as it tastes? These aren’t just any ordinary cookies; they’re little edible masterpieces designed to delight both the eyes and the palate. We all love the warm, comforting flavors of autumn, and these Milk Chocolate Stuffed Jack-O’-Lantern Cookies deliver that in spades with their tender cookie dough and a molten, gooey milk chocolate center. What truly sets them apart, however, is the playful jack-o’-lantern design, transforming a simple bake into a fun, seasonal project that’s perfect for family baking sessions or impressing guests at your Halloween party. Get ready to embrace the cozy spirit and bake up a batch of pure joy!

Milk Chocolate Stuffed Jack-O’-Lantern Cookies
Get ready to embrace the spirit of fall and Halloween with these utterly delightful Milk Chocolate Stuffed Jack-O’-Lantern Cookies! These aren’t just any cookies; they’re little edible pumpkins, bursting with gooey milk chocolate and spiced to perfection. Imagine biting into a soft, chewy cookie, only to discover a molten river of chocolate inside – pure autumnal bliss! These are perfect for sharing at a Halloween party, as a special treat for your family, or even just to brighten your own cozy afternoon. Let’s get baking!
Ingredients:
- 3 sticks (1 1/2 cups) salted butter, softened
- 1 1/4 cups light brown sugar, packed
- 1 tablespoon pure vanilla extract
- 2 eggs, at room temperature
- 4 1/2 cups all-purpose flour
- 1 teaspoon baking soda
- 1 teaspoon cinnamon
- 1/2 teaspoon ginger
- 1/4 teaspoon nutmeg
- 1/2 teaspoon salt
- 12 ounces milk chocolate, melted
- 2 tablespoons salted butter
- 3 tablespoons cinnamon sugar
Cookie Dough Preparation
The foundation of these amazing cookies is a perfectly balanced dough that’s both flavorful and easy to work with. Starting with softened butter is crucial for achieving that light and fluffy texture when creaming it with the sugar. Make sure your butter is pliable but not melted – the consistency of a slightly softened block is ideal. You’ll want to cream the butter and brown sugar together until the mixture is light in color and fluffy. This process incorporates air, which contributes to the cookies’ texture. Don’t rush this step; it’s worth the extra minute or two! Next, beat in the vanilla extract and the room temperature eggs, one at a time. Adding eggs at room temperature helps them emulsify better into the batter, preventing a greasy outcome.
In a separate bowl, whisk together the all-purpose flour, baking soda, cinnamon, ginger, nutmeg, and salt. These dry ingredients will give our cookies that warm, cozy spice profile that’s synonymous with autumn. Gradually add the dry ingredients to the wet ingredients, mixing on low speed or by hand until just combined. Overmixing can develop the gluten in the flour too much, leading to tough cookies, so stop as soon as you no longer see streaks of flour. The dough will be soft but should hold its shape.
Chocolate Filling Preparation
Now for the star of the show – the molten milk chocolate center! For the filling, you’ll melt your 12 ounces of milk chocolate. You can do this either gently in the microwave in 30-second intervals, stirring between each, or over a double boiler. The key is to melt it slowly and evenly to avoid scorching. Once melted and smooth, stir in the 2 tablespoons of salted butter. This extra bit of butter makes the chocolate filling even more luscious and helps it stay a bit softer even after baking, ensuring a delightfully gooey center. Allow the chocolate mixture to cool slightly, but not so much that it begins to set. It should still be pourable but not hot enough to melt the dough immediately.
Shaping and Stuffing the Jack-O’-Lanterns
This is where the magic truly happens! To create our jack-o’-lanterns, we’ll work with portions of the cookie dough. I like to scoop about 2 tablespoons of dough for each cookie. Roll each portion into a ball. Now, take a small amount of your slightly cooled milk chocolate filling and place it in the center of one dough ball. You want to create a pocket of chocolate. Then, take another ball of dough, flatten it slightly, and place it on top of the chocolate, essentially sandwiching the filling between two pieces of dough. Gently pinch and press the edges of the two dough halves together to completely seal in the chocolate. This is a crucial step to prevent the chocolate from oozing out during baking. Ensure there are no gaps or openings.
Once you have your filled dough balls, it’s time to give them their jack-o’-lantern charm. You can do this by lightly flattening each ball with your palm or the bottom of a glass to create a disc shape. Then, using a knife or a toothpick, carefully draw the classic jack-o’-lantern features: two triangle eyes, a small triangle nose, and a jagged mouth. Be gentle, as you don’t want to cut all the way through the dough. These simple indentations will bake into adorable pumpkin faces.
Baking and Finishing Touches
Preheat your oven to 350°F (175°C). Line your baking sheets with parchment paper to prevent sticking and ensure even baking. Place your beautifully crafted jack-o’-lantern cookies onto the prepared baking sheets, leaving a couple of inches between them as they will spread slightly.
Bake for 10-12 minutes, or until the edges are lightly golden brown and the centers appear set. The exact baking time will depend on your oven, so keep a close eye on them. We’re looking for a cookie that’s cooked through but still soft and chewy in the middle, especially around the chocolate filling.
Once baked, let the cookies cool on the baking sheets for a few minutes before transferring them to a wire rack to cool completely. While the cookies are still warm, but not hot, lightly brush the tops with a tiny bit of melted butter (you might not even need the 2 tablespoons, just a little to help the cinnamon sugar adhere). Immediately sprinkle the tops generously with the cinnamon sugar mixture. The warmth of the cookie will help the cinnamon sugar stick, creating a beautiful, sparkly finish and adding another layer of warm spice.
Enjoy these delightful Milk Chocolate Stuffed Jack-O’-Lantern Cookies warm, when the chocolate is at its melty, gooey best, or let them cool completely for a firmer, yet still wonderfully chocolatey, treat. They’re best enjoyed within a few days, but I doubt they’ll last that long!
Conclusion:
I hope you’ve enjoyed learning how to create these delightful Milk Chocolate Stuffed Jack-O’-Lantern Cookies! They truly are a showstopper for any autumn gathering, offering a perfect blend of classic cookie comfort and a fun, festive surprise inside. The tender, buttery cookie dough with its vibrant orange hue, combined with the gooey, melted milk chocolate center, makes for an absolutely irresistible treat. These cookies are not only visually appealing, perfectly capturing the spirit of Halloween, but they also deliver an explosion of flavor with every bite.
Serve these festive cookies as a charming dessert at your Halloween party, as a thoughtful homemade gift for friends and family, or simply as a special treat to brighten up an ordinary autumn afternoon. For variations, feel free to experiment with different types of chocolate chips, such as dark or white chocolate, or even add a pinch of cinnamon or nutmeg to the cookie dough for an extra layer of autumnal spice. Don’t be afraid to get creative with your decorating, using orange and black icing to enhance the jack-o’-lantern faces! I highly encourage you to give this recipe a try; it’s wonderfully rewarding and guaranteed to bring smiles all around.
Frequently Asked Questions:
Can I make the dough ahead of time?
Absolutely! You can prepare the cookie dough, wrap it tightly in plastic wrap, and refrigerate it for up to 2-3 days. Let it sit at room temperature for about 15-20 minutes before scooping and stuffing to make it easier to handle.
What if I don’t have orange food coloring?
While orange food coloring is key for the visual appeal of the jack-o’-lantern, you can still make delicious chocolate-stuffed cookies without it. They might not have the signature color, but the taste will be just as wonderful!
Milk Chocolate Stuffed Jack-O’-Lantern Cookies
Festive cookies with a sweet milk chocolate filling, shaped like jack-o’-lanterns and topped with cinnamon sugar.
Ingredients
-
3 sticks (1 1/2 cups) salted butter, softened
-
1 1/4 cups light brown sugar, packed
-
1 tablespoon pure vanilla extract
-
2 eggs, at room temperature
-
4 1/2 cups all-purpose flour
-
1 teaspoon baking soda
-
1 teaspoon cinnamon
-
1/2 teaspoon ginger
-
1/4 teaspoon nutmeg
-
1/2 teaspoon salt
-
12 ounces milk chocolate, melted
-
2 tablespoons salted butter
-
3 tablespoons cinnamon sugar
Instructions
-
Step 1
In a large bowl, cream together the softened butter and brown sugar until light and fluffy. Beat in the vanilla extract and eggs, one at a time, until well combined. -
Step 2
In a separate medium bowl, whisk together the flour, baking soda, cinnamon, ginger, nutmeg, and salt. Gradually add the dry ingredients to the wet ingredients, mixing until just combined. Do not overmix. -
Step 3
Divide the dough in half. Roll each half into a log and wrap in plastic wrap. Chill for at least 30 minutes. -
Step 4
Preheat oven to 375°F (190°C). Line baking sheets with parchment paper. -
Step 5
On a lightly floured surface, slice the dough logs into 1/4-inch thick rounds. Place about 1 tablespoon of melted milk chocolate in the center of half the cookie rounds. Top with the remaining cookie rounds, pressing gently to seal the edges. Use a round cookie cutter or the rim of a glass to create a slightly larger circle. Then, use a small knife to cut out triangle eyes and a jagged mouth to resemble a jack-o’-lantern. -
Step 6
Bake for 10-12 minutes, or until the edges are lightly golden. -
Step 7
While the cookies are still warm, gently brush the tops with the melted butter. Sprinkle generously with cinnamon sugar.
Important Information
Nutrition Facts (Per Serving)
It is important to consider this information as approximate and not to use it as definitive health advice.
Allergy Information
Please check ingredients for potential allergens and consult a health professional if in doubt.